
TensorFlowで回帰をやってみる例。もとネタはCS224d: TensorFlow Tutorialから。
最近であれば、どのLinuxディストリビューションでもパッケージシステムにpythonは基本入っているので、最新のを使わなければならないのでなければ、パッケージをつかえば良い。 Spyderを使っても良いが、操作性を考えるとJupyer Notebookが最も使いやすいと思われ、 Debianであれば、virtualenvを含めて下記あたりを入れれば良いだろう。ipythonが対話的シェルで、jupyterがWebサーバとなる。 python2は古いので、特段の事情がなければ、python3を使う。
        python3-ipython - Enhanced interactive Python shell (Python 3 version)
        python3-ipython-genutils - IPython vestigial utilities for Python 3
        python3-jupyter-client - Jupyter protocol client APIs (Python 3)
        python3-jupyter-console - Jupyter terminal client (Python 3)
        python3-jupyter-core - Core common functionality of Jupyter projects for Python 3
        virtualenv - Python virtual environment creator
        virtualenvwrapper - extension to virtualenv for managing multiple virtual Python environments
        virtualenv-clone - script for cloning a non-relocatable virtualenv
        python3-virtualenv - Python virtual environment creator
TensorFlowは、whlパッケージ提供されており、そのままpipインストールすると/usr/localあたりかホームディレクトリに入るが、 更新等があるので、virtualenvでTensorFlow用のディレクトリをつくってそこに入れておくのがおすすであり、本家のドキュメントでも推奨されている。 --system-site-packagesをつけてディストリビューションのパッケージを使っても良いし、--no-site-packagesで新たにすべて入れても良い。
        user@debian57:/opt$ virtualenv tensorflow-py3.5m -p /usr/bin/python3.5m
        Running virtualenv with interpreter /usr/bin/python3.5m
        Using base prefix '/usr'
        New python executable in /opt/tensorflow-py3.5m/bin/python3.5m
        Also creating executable in /opt/tensorflow-py3.5m/bin/python
        Installing setuptools, pkg_resources, pip, wheel...done.

        user@debian57:/opt$ . tensorflow-py3.5m/bin/activate
        (tensorflow-py3.5m) user@debian57:/opt$ pip3 install /home/user/tmp/tensorflow-1.8.0-cp35-cp35m-linux_x86_64.whl

        Processing /home/user/tmp/tensorflow-1.8.0-cp35-cp35m-linux_x86_64.whl
        Collecting protobuf>=3.4.0 (from tensorflow==1.8.0)
        Using cached https://files.pythonhosted.org/packages/5b/c3/9b947e301e19bea75dc8c1fd3710eed5d2b31aa13ae13d5e38e891f784cc/protobuf-3.5.2.post1-cp35-cp35m-manylinux1_x86_64.whl
        Collecting grpcio>=1.8.6 (from tensorflow==1.8.0)
        Using cached https://files.pythonhosted.org/packages/2c/ff/f118147fd7a8d2d441d15e1cb7fefb2c1981586e24ef3a7d8a742535b085/grpcio-1.12.0-cp35-cp35m-manylinux1_x86_64.whl
        Collecting termcolor>=1.1.0 (from tensorflow==1.8.0)
        Collecting numpy>=1.13.3 (from tensorflow==1.8.0)
        Using cached https://files.pythonhosted.org/packages/7b/61/11b05cc37ccdaabad89f04dbdc2a02905cf6de6f9b05816dba843beed328/numpy-1.14.3-cp35-cp35m-manylinux1_x86_64.whl
        Collecting astor>=0.6.0 (from tensorflow==1.8.0)
        Using cached https://files.pythonhosted.org/packages/b2/91/cc9805f1ff7b49f620136b3a7ca26f6a1be2ed424606804b0fbcf499f712/astor-0.6.2-py2.py3-none-any.whl
        Collecting gast>=0.2.0 (from tensorflow==1.8.0)
        Requirement already satisfied: wheel>=0.26 in ./tensorflow-py3.5m/lib/python3.5/site-packages (from tensorflow==1.8.0) (0.31.1)
        Collecting absl-py>=0.1.6 (from tensorflow==1.8.0)
        Collecting tensorboard<1.9.0,>=1.8.0 (from tensorflow==1.8.0)
        Using cached https://files.pythonhosted.org/packages/59/a6/0ae6092b7542cfedba6b2a1c9b8dceaf278238c39484f3ba03b03f07803c/tensorboard-1.8.0-py3-none-any.whl
        Collecting six>=1.10.0 (from tensorflow==1.8.0)
        Using cached https://files.pythonhosted.org/packages/67/4b/141a581104b1f6397bfa78ac9d43d8ad29a7ca43ea90a2d863fe3056e86a/six-1.11.0-py2.py3-none-any.whl
        Requirement already satisfied: setuptools in ./tensorflow-py3.5m/lib/python3.5/site-packages (from protobuf>=3.4.0->tensorflow==1.8.0) (39.2.0)
        Collecting markdown>=2.6.8 (from tensorboard<1.9.0,>=1.8.0->tensorflow==1.8.0)
        Using cached https://files.pythonhosted.org/packages/6d/7d/488b90f470b96531a3f5788cf12a93332f543dbab13c423a5e7ce96a0493/Markdown-2.6.11-py2.py3-none-any.whl
        Collecting bleach==1.5.0 (from tensorboard<1.9.0,>=1.8.0->tensorflow==1.8.0)
        Using cached https://files.pythonhosted.org/packages/33/70/86c5fec937ea4964184d4d6c4f0b9551564f821e1c3575907639036d9b90/bleach-1.5.0-py2.py3-none-any.whl
        Collecting html5lib==0.9999999 (from tensorboard<1.9.0,>=1.8.0->tensorflow==1.8.0)
        Collecting werkzeug>=0.11.10 (from tensorboard<1.9.0,>=1.8.0->tensorflow==1.8.0)
        Using cached https://files.pythonhosted.org/packages/20/c4/12e3e56473e52375aa29c4764e70d1b8f3efa6682bef8d0aae04fe335243/Werkzeug-0.14.1-py2.py3-none-any.whl
        Installing collected packages: six, protobuf, grpcio, termcolor, numpy, astor, gast, absl-py, markdown, html5lib, bleach, werkzeug, tensorboard, tensorflow
        Successfully installed absl-py-0.2.2 astor-0.6.2 bleach-1.5.0 gast-0.2.0 grpcio-1.12.0 html5lib-0.9999999 markdown-2.6.11 numpy-1.14.3 protobuf-3.5.2.post1 six-1.11.0 tensorboard-1.8.0 tensorflow-1.8.0 termcolor-1.1.0 werkzeug-0.14.1
virtualenv環境でインストールしたパッケージは、jupyter-notebookでは探すことができないので、起動後に別途sys.path.append()でsite-packagesの場所を追加するか、 virtualenv下にipythonを別途インストールした上でそこからipythonをkernelとしてインストールする必要がある。
        (tensorflow-py3.5m) user@debian57:/opt$
        (tensorflow-py3.5m) user@debian57:/opt$ pip3 install ipykernel
        (tensorflow-py3.5m) user@debian57:/opt$ ipython3 kernel install --user --name=tensorflow-py3.5m
        Installed kernelspec tensorflow-py3.5m in /home/user/.local/share/jupyter/kernels/tensorflow-py3.5m
        (tensorflow-py3.5m) user@debian57:~/.local/share/jupyter/kernels$ cat  /home/user/.local/share/jupyter/kernels/tensorflow-py3.5m/kernel.json
        {
        "argv": [
        "/opt/tensorflow-py3.5m/bin/python3.5m",
        "-m",
        "ipykernel_launcher",
        "-f",
        "{connection_file}"
        ],
        "language": "python",
        "display_name": "tensorflow-py3.5m"
準備できたら、ルートにしたいディレクトリでjupyterを起動し、Webブラウザでファイルを開く。カーネルは上記ユーザの場所か/usr/share/jupyter/kernelsにインストールされているものが使える。
        user@debian57:~/tmp/jupyter$ jupyter-notebook
        [W 22:02:47.388 NotebookApp] Config option `token` not recognized by `NotebookApp`.
        [W 22:02:47.658 NotebookApp] Widgets are unavailable. On Debian, notebook support for widgets is provided by the package jupyter-nbextension-jupyter-js-widgets
        [I 22:02:47.676 NotebookApp] Serving notebooks from local directory: /home/user/tmp/jupyter
        [I 22:02:47.676 NotebookApp] 0 active kernels
        [I 22:02:47.677 NotebookApp] The Jupyter Notebook is running at: http://192.168.11.20:8888/
        [I 22:02:47.677 NotebookApp] Use Control-C to stop this server and shut down all kernels (twice to skip confirmation).
バージョンを表示し、パスを表示してから、sinの加算された一次関数をnumpyで回帰分析してみる。
        import platform
        print(platform.python_version())
        import sys
        print(sys.path)
        import numpy as np
        print(np.__version__)
        import matplotlib
        import matplotlib.pyplot as plt
        x_data = np.arange(100,step=.1)
        y_data = 4 * x_data + 60*np.sin(x_data/10)
        plt.scatter(x_data, y_data)
        plt.show()

        z = np.polyfit(x_data, y_data, 1)
        p = np.poly1d(z)
        print(p)
TensorFlowをインストールするだけのページによくあるHello Worldをやってから、回帰分析を最急降下法(Gradient descent)等で行う。 コマンドで*.pyを毎回実行するのであれば、変数の使いまわし等は気にしないでよいが、Jupyterなど対話的コンソールでは、 一回入力した後変数が保持されたままなので、TensorFlowの場合は、reuseを指定するか、毎回リセットする必要がある。
        import sys
        sys.path.append('/opt/tensorflow-py3.5m/lib/python3.5/site-packages')
        import tensorflow as tf
        hello = tf.constant('Hello, TensorFlow!')
        sess = tf.Session()
        print(sess.run(hello))
        print(tf.get_variable_scope().reuse)
        with tf.variable_scope(tf.get_variable_scope(), reuse=True):
        print(tf.get_variable_scope().reuse)
        print(tf.get_variable_scope().reuse)
        n_samples = 1000
        batch_size = 100
        X_data = np.reshape(x_data, (n_samples,1))
        Y_data = np.reshape(y_data, (n_samples,1))

        # Reset tf to suppress following error:
        # Variable linear-regression/weights already exists, disallowed.
        # Did you mean to set reuse=True or reuse=tf.AUTO_REUSE in VarScope? Originally defined at:
        tf.reset_default_graph()
        X = tf.placeholder(tf.float32, shape=(batch_size,1))
        Y = tf.placeholder(tf.float32, shape=(batch_size,1))
        with tf.variable_scope("linear-regression", reuse=False):
            W = tf.get_variable("weights", (1, 1),
                                initializer=tf.random_normal_initializer())
            b = tf.get_variable("bias",(1,),
                                initializer=tf.constant_initializer(0.0))
            y_pred = tf.matmul(X, W) + b
            loss = tf.reduce_sum((Y - y_pred)**2/n_samples)

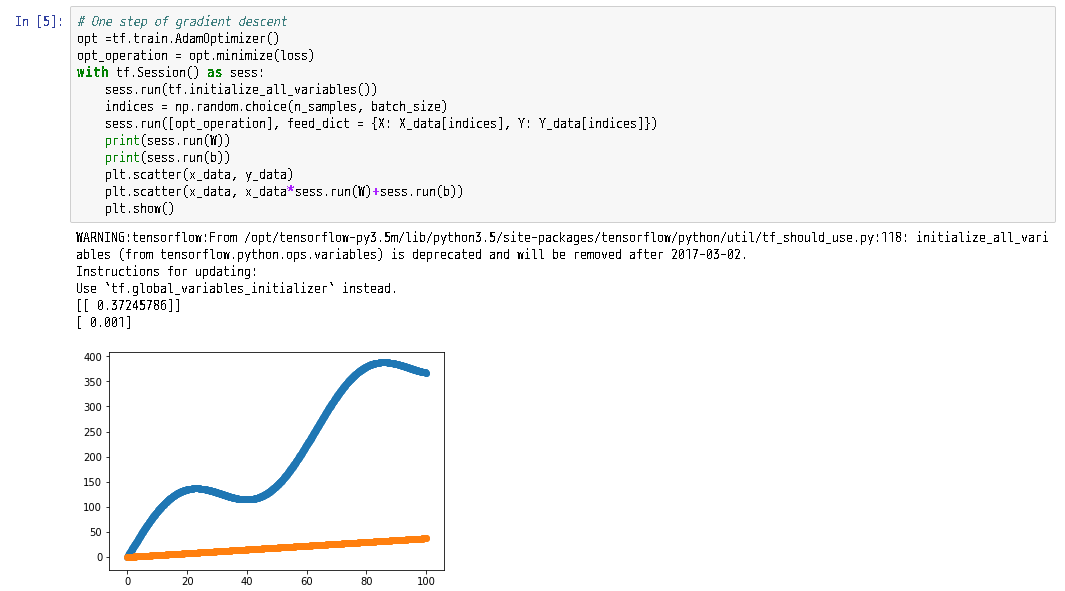
1-ステップ分の操作は以下のようになる。tf.global_variables_initializerを使うようにと警告が出ている。
        # One step of gradient descent
        opt =tf.train.AdamOptimizer()
        opt_operation = opt.minimize(loss)
        with tf.Session() as sess:
            sess.run(tf.initialize_all_variables())
            indices = np.random.choice(n_samples, batch_size)
            sess.run([opt_operation], feed_dict = {X: X_data[indices], Y: Y_data[indices]})
            print(sess.run(W))
            print(sess.run(b))
            plt.scatter(x_data, y_data)
            plt.scatter(x_data, x_data*sess.run(W)+sess.run(b))
            plt.show()
100回程度だと不十分。
        opt_operation = tf.train.AdamOptimizer().minimize(loss)
        count = 100
        with tf.Session() as sess:
            sess.run(tf.initialize_all_variables())
            for _ in range(count):
                indices = np.random.choice(n_samples, batch_size)
                X_batch, Y_batch = X_data[indices], Y_data[indices]
                _, loss_val = sess.run([opt_operation, loss], feed_dict={X:X_batch, Y:Y_batch})
            print(sess.run(W))
            print(sess.run(b))
            plt.scatter(x_data, y_data)
            plt.scatter(x_data, x_data*sess.run(W)+sess.run(b))
            plt.show()

この例では、10000回でまあまの結果になる。
        opt_operation = tf.train.AdamOptimizer().minimize(loss)
        count = 10000
        loss_ = np.zeros(count)
        with tf.Session() as sess:
            sess.run(tf.initialize_all_variables())
            for _ in range(count):
                indices = np.random.choice(n_samples, batch_size)
                X_batch, Y_batch = X_data[indices], Y_data[indices]
                step = _
                _, loss_val = sess.run([opt_operation, loss], feed_dict={X:X_batch, Y:Y_batch})
                loss_[step] = loss_val
            print(sess.run(W))
            print(sess.run(b))
            plt.scatter(x_data, y_data)
            plt.scatter(x_data, x_data*sess.run(W)+sess.run(b))
            plt.show()
        plt.figure(figsize=(12,4))
        plt.scatter(np.arange(count,step=1), loss_)
        plt.show()

Optimizerは色々な種類が実装されている。
tf.train.AdagradOptimizer()
	opt_operation = tf.train.AdagradOptimizer(0.05).minimize(loss)
	count = 2000
	loss_ = np.zeros(count)
	with tf.Session() as sess:
	    sess.run(tf.global_variables_initializer())
	    for _ in range(count):
	        indices = np.random.choice(n_samples, batch_size)
	        X_batch, Y_batch = X_data[indices], Y_data[indices]
	        step = _
	        _, loss_val = sess.run([opt_operation, loss], feed_dict={X:X_batch, Y:Y_batch})
	        loss_[step] = loss_val
	    print(sess.run(W))
	    print(sess.run(b))
	    plt.scatter(x_data, y_data)
	    plt.scatter(x_data, x_data*sess.run(W)+sess.run(b))
	    plt.show()
	plt.figure(figsize=(12,4))
	plt.scatter(np.arange(count,step=1), loss_)
	plt.show()

tf.train.GradientDescentOptimizer()
いくつかの最適化ではパラメータが必要である。
	opt_operation = tf.train.GradientDescentOptimizer(0.0001).minimize(loss)
	count = 500
	loss_ = np.zeros(count)
	with tf.Session() as sess:
	    sess.run(tf.global_variables_initializer())
	    for _ in range(count):
	        indices = np.random.choice(n_samples, batch_size)
	        X_batch, Y_batch = X_data[indices], Y_data[indices]
	        step = _
	        _, loss_val = sess.run([opt_operation, loss], feed_dict={X:X_batch, Y:Y_batch})
	        loss_[step] = loss_val
	    print(sess.run(W))
	    print(sess.run(b))
	    plt.scatter(x_data, y_data)
	    plt.scatter(x_data, x_data*sess.run(W)+sess.run(b))
	    plt.show()
	plt.figure(figsize=(12,4))
	plt.scatter(np.arange(count,step=1), loss_)
	plt.show()

bzr is slower than Subversion in combination with Sourceforge.

[Dazjorz](http://dazjorz.com/) (17-September-2009)

    -- Dazjorz
    -- Chat with Shlomi Fish

Q: How many hardware engineers does it take to replace a lightbulb?

A: None! We'll fix it in software.